CSS in Docusaurus
Styling encompasses the look of all elements on a site, including colors, fonts, text size, tables, margins, and so on. Instead of having to style each page individually, a set of packaged styles is available. There is also a default style that is used if no other has been specified.
Styles for the Docs Products repo can be found in the file src\css\custom.css
The styles are defined using CSS (Cascading Style Sheets), a language that can control a number of attributes of HTML elements. For example, in a HTML page a header can be created using:
<H1>This is a header</H1>
The HTML element here is <H1>. In standard HTML, it shows using the font Times New Roman, black text, and a font size of 2em:

Let's change the text colour to blue using CSS. This is done by writing the name of the header element and place some attributes inside curly brackets:
H1 {
    color: blue;
}
The result:

This works well if we want to change the style for all H1 headers on the site. But since Docs Products will be using different looks for different section we'll need a more precise method to do it.
In addition to using the element name itself we can also use class. By assigning a class to an element, we can refer to that instead in the CSS:
<H1 class="my-style">This is a header</H1>
Now we can write (note the period before the class name):
.my-style {
    color: blue;
}
The advantage of doing it this way is that we can control several elements at the same time. For example, if we want to set the color for all types of headers (H1, H2, H3, H4), we just assign those the class my-style instead of creating a separate CSS section for each one:
<H1 class="my-style">Huge header</H1>
<H2 class="my-style">Big header</H2>
<H3 class="my-style">Normal header</H3>
<H4 class="my-style">Small header</H4>
Result:

But using only that to style entire groups of pages would be more work than just writing CSS for each page. And that's where the Cascading part of Cascading Style Sheets comes in.
CSS is a pretty flexible format. It's possible to assign multiple contradictory styles to the same element, and which one is used is determined by the order they are read by the browser. It's also possible to accidentally change the style of all elements on a page by targeting the wrong enclosing tag.
The latter part is a feature though. Take a look at the basic structure of a HTML page:
<html>
</head>
    <body>
        <H1>This is a header</H1>

        Lorem ipsum dolor sit amet, consectetur adipiscing elit.
        Curabitur sed semper tellus. Vestibulum ut tristique nunc.
        Nam rhoncus tempus ligula, in scelerisque massa dapibus id.
    </body>
</html>
We can see that the content of the page itself is enclosed in a <body> tag. If we want to change the size of the text, we can use:
body {
    text-size: 12px;
}
This will affect all text on the page. It will also change the text on all pages in the repo, and we don't want that. So instead of using <body> as an enclosing tag, we can simply add our own:
<html>
</head>
    <body>
        <div class="page-style">
            <H1>This is a header</H1>

            Lorem ipsum dolor sit amet, consectetur adipiscing elit.
            Curabitur sed semper tellus. Vestibulum ut tristique nunc.
            Nam rhoncus tempus ligula, in scelerisque massa dapibus id.
        </div>
    </body>
</html>
We can now control all elements inside the <div> tag without changing anything on other pages.
<div> is used because it's a standard element for grouping other elements, but others can also be used, like <p>, <span> and similar.
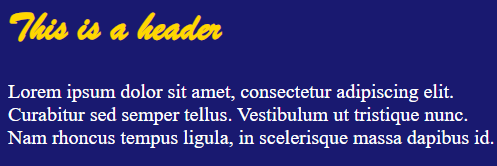
The way this works in CSS: when setting up a new CSS rule, we start by using the class name of the enclosing div-tag, followed by the name of the element we want to style. If we want to change the H1 header in the page above to something more fancy, we can do:
.page-style H1 {
    font-family: 'Brush Script MT', cursive;
    font-style: italic;
    color: gold;
}
Result:
And that is why <div> tags have been used to set the layout/style of pages. With the latest version (pushed 2025-01-22), we'll have one default style that doesn't need a <div>. If some other style is needed (like in the legal pages), an encompassing tag with the right class name has to be added.
An advantage of using this method is that we can mix and match styles by adding more tags. Say we want to make one table on a page look different from the standard design. We can do this by adding a <div> around just that table:
<div class="index-table">
| Col 1     | Col 2     |
| :---      | :---      |
| Some      | text      |
</div>
It will now have the same look as the tables on the index page at https://thankful-water-06a6c0b03.5.azurestaticapps.net/.
Image sizes
Images can be resized to fit the page better. This is done by changing an attribute in the MArkdown link. An image link there looks like:

The word medium in the example sets the width in pixels of the picture, not the overall size. It's scaled proportionally, so the height is automatically set.
The following sizes can be used (more can be added if needed):
| Attribute | Width in pixels |
|---|---|
| tiny | 100 |
| smaller | 200 |
| small | 400 |
| medium | 600 |
| large | 800 |
| largest | 1000 |
In addition, a set of styles that uses more exact (but less memorable) class names is also available;
| Attribute | Width in pixels |
|---|---|
| width-20 | 20 |
| width-50 | 50 |
| width-100 | 100 |
| width-200 | 200 |
| width-300 | 300 |
| width-400 | 400 |
| width-500 | 500 |
| width-600 | 600 |
| width-700 | 700 |
| width-800 | 800 |
| width-900 | 900 |
| width-1000 | 1000 |
| width-1100 | 1100 |
| width-1200 | 1200 |
| width-1300 | 1300 |
| width-1400 | 1400 |
| width-1500 | 1500 |
| width-1600 | 1600 |