Description of the functionality
Vendor statement form
ExFlow Common| Common| Vendor statements| Vendor statement
Vendor statement form has four statuses: Open, Validated, Reconciled and posted.
Allows users to view details of vendor statements including date period, vendor, and Statement ID which when clicked gives more information about statement.
Please note that in this process “from-date” is optional since the vendor should send all open items regardless of age but some vendor will send with from date and the end date/Cut-off date need to be unique per vendor and statement.
When the statement is created, if it comes from the staging table the “original” file should be attached using the document handler.
The main idea is to have the statement being created by the batch job. But users can also use “import statement” function to import statements manually.
| Field | Description |
|---|---|
| Edit | To edit the statement lines. |
| Save | Save the settings. |
| New | Add new line. |
| Import statement | Manually import statement file. |
| Reopen | Reopens statements in status validated, posted statements cannot be reopened. |
| Validate | Before a statement can be reconciled it must be validated. Validates that the account matches a vendor in the legal entity, currency, from date and to date and the rules from vendor rules set. To/end date needs to be unique per statement and vendor. |
| Post | The statement needs to be reconciled to be posted. If vendor transaction is fully paid the posting sets the transactions as fully reconciled. When statement is posted buttons for reopen and validate is greyed out. |
| Status | Shows the settlement matching status. |
| Statement ID | Statement Id. |
| Vendor account | Vendor account. |
| Name | Vendor name. |
| Currency | Currency of the statement. |
| From date | Statement from date. |
| To date | Statement cut-off date, needs to be unique per vendor account. |
| Opening balance | Opening balance per vendor. |
| Ending balance | Ending balance per vendor. |
| Posted | Ticked if statement is posted. |
| Field | Description |
|---|---|
| From date | Statement from date. |
| To date | Statements to date. |
| Opening balance | Calculated from previous statements closing balance, if difference from imported amount for opening balance a new statement line is created for the difference amount. If the opening balance is empty from file - previous statements closing balance is set. |
| Ending balance | If closing balance amount from file - the amount from file is set. If blank from file – calculates opening + NET amount = Ending/closing balance. |
| Net amount | Calculated from statement lines, includes the difference for opening balance. |
Vendor reconciliation form
ExFlow Common | Common | Vendor statements | Vendor reconciliation
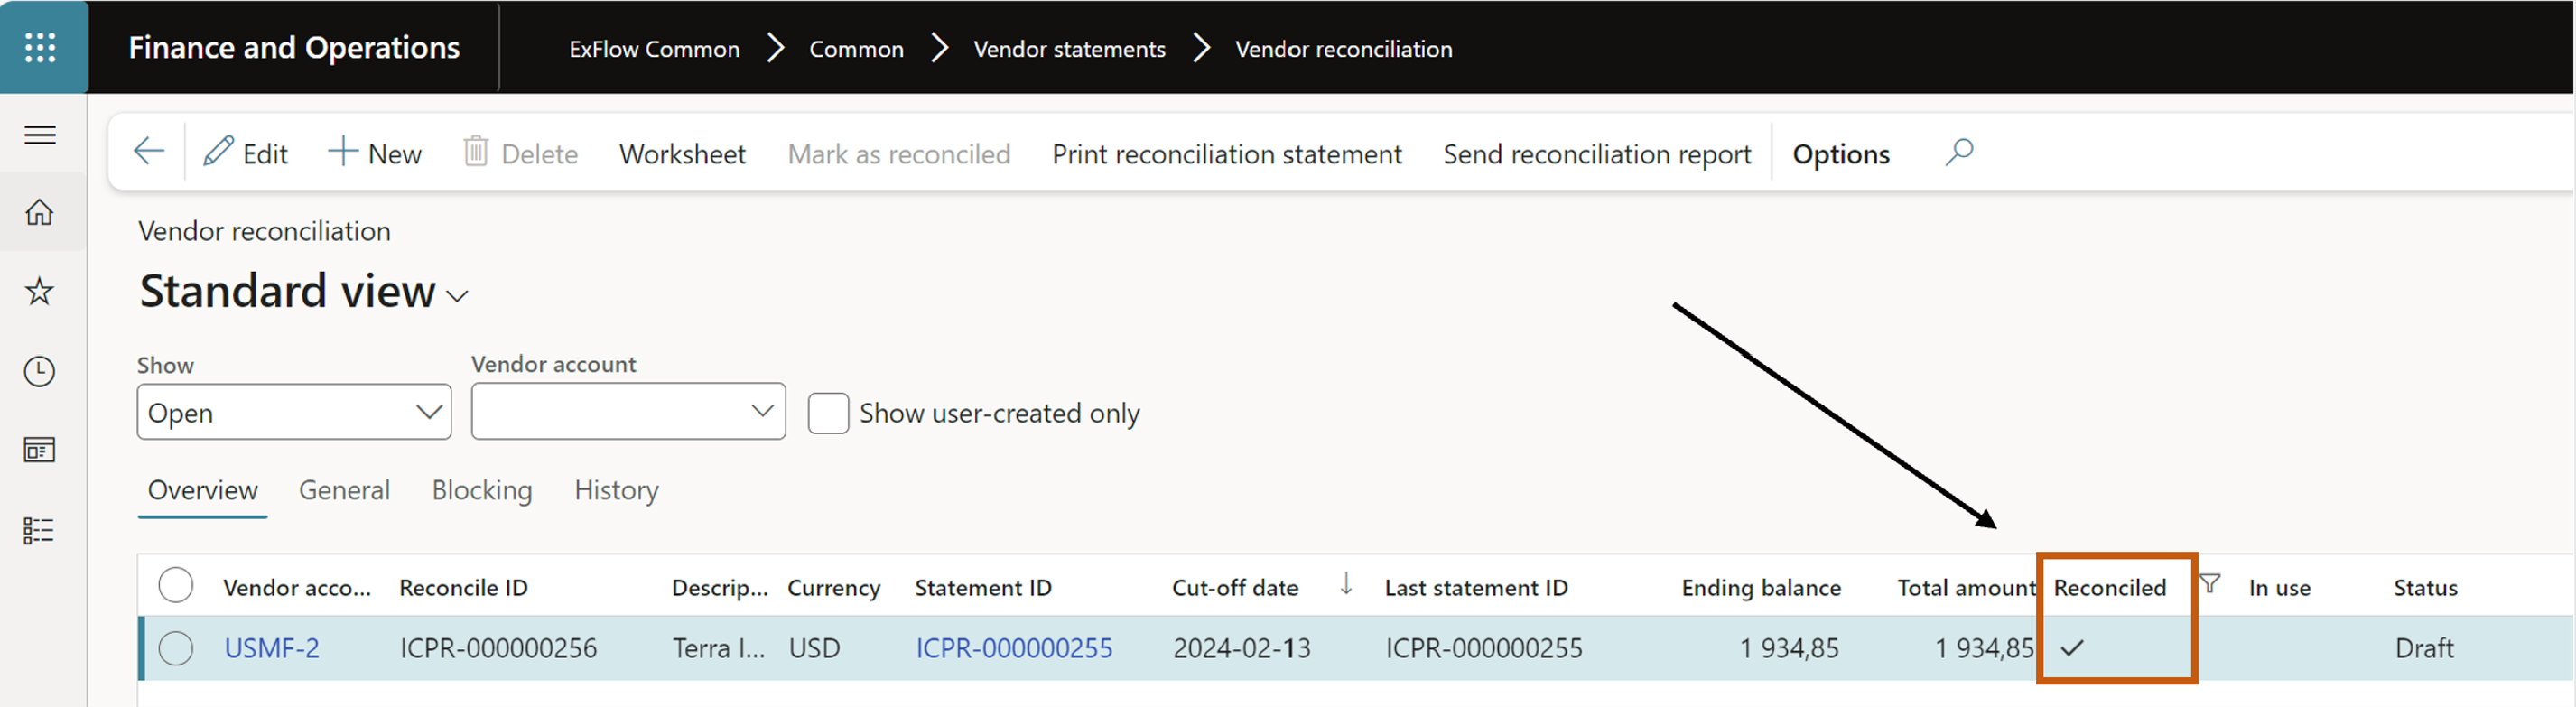
Shows the reconciliations connected to the statement. It can be filtered and show: Open statements, Reconciliated statements or All. Only one vendor account can be selected.
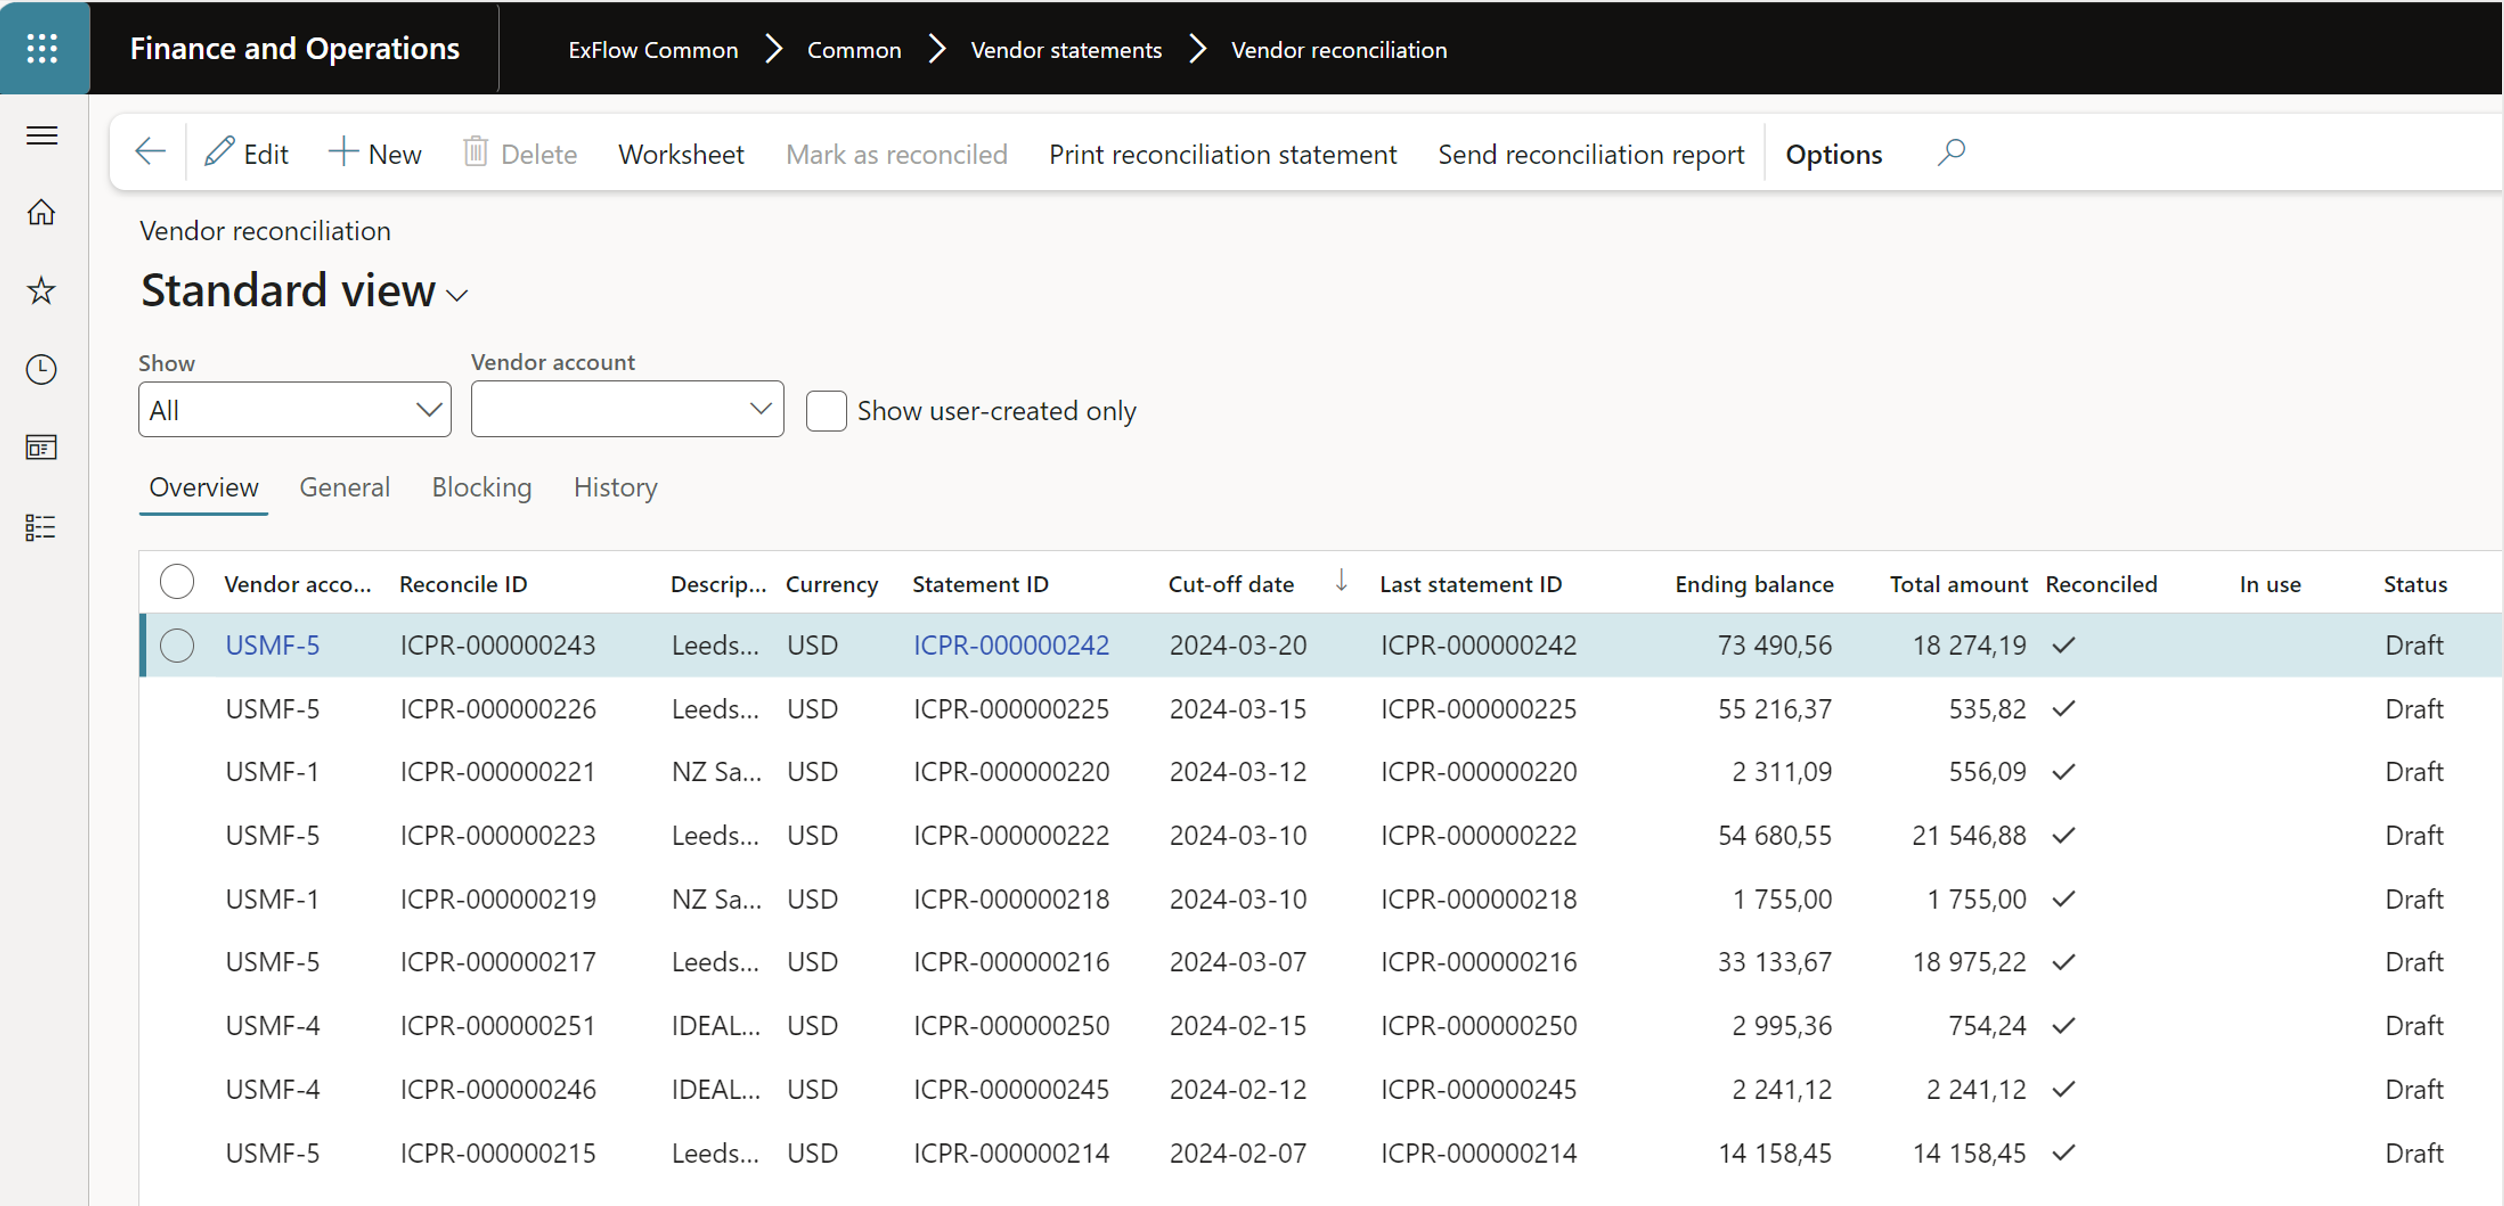
| Field | Description |
|---|---|
| Edit | To manually pick up a statement to reconcile. |
| Save | Save the manual changes. |
| New | Add new line to manually create reconciliation worksheet and connect the statement. |
| Delete | Delete the marked line. |
| Worksheet | Reconciliation worksheet, to reconcile statement lines against vendor transactions. |
| Mark as reconciled | To mark the reconciliation as reconciled and done. |
| Print reconciliation | To print the exception report for the reconciliation. |
| Send reconciliation report | Creates an email to the email defined on the statement or the vendors primary email if no email is defined on the vendor statement. |
| Show statement file | Shows the statement image that is imported and attached to the Xml file. |
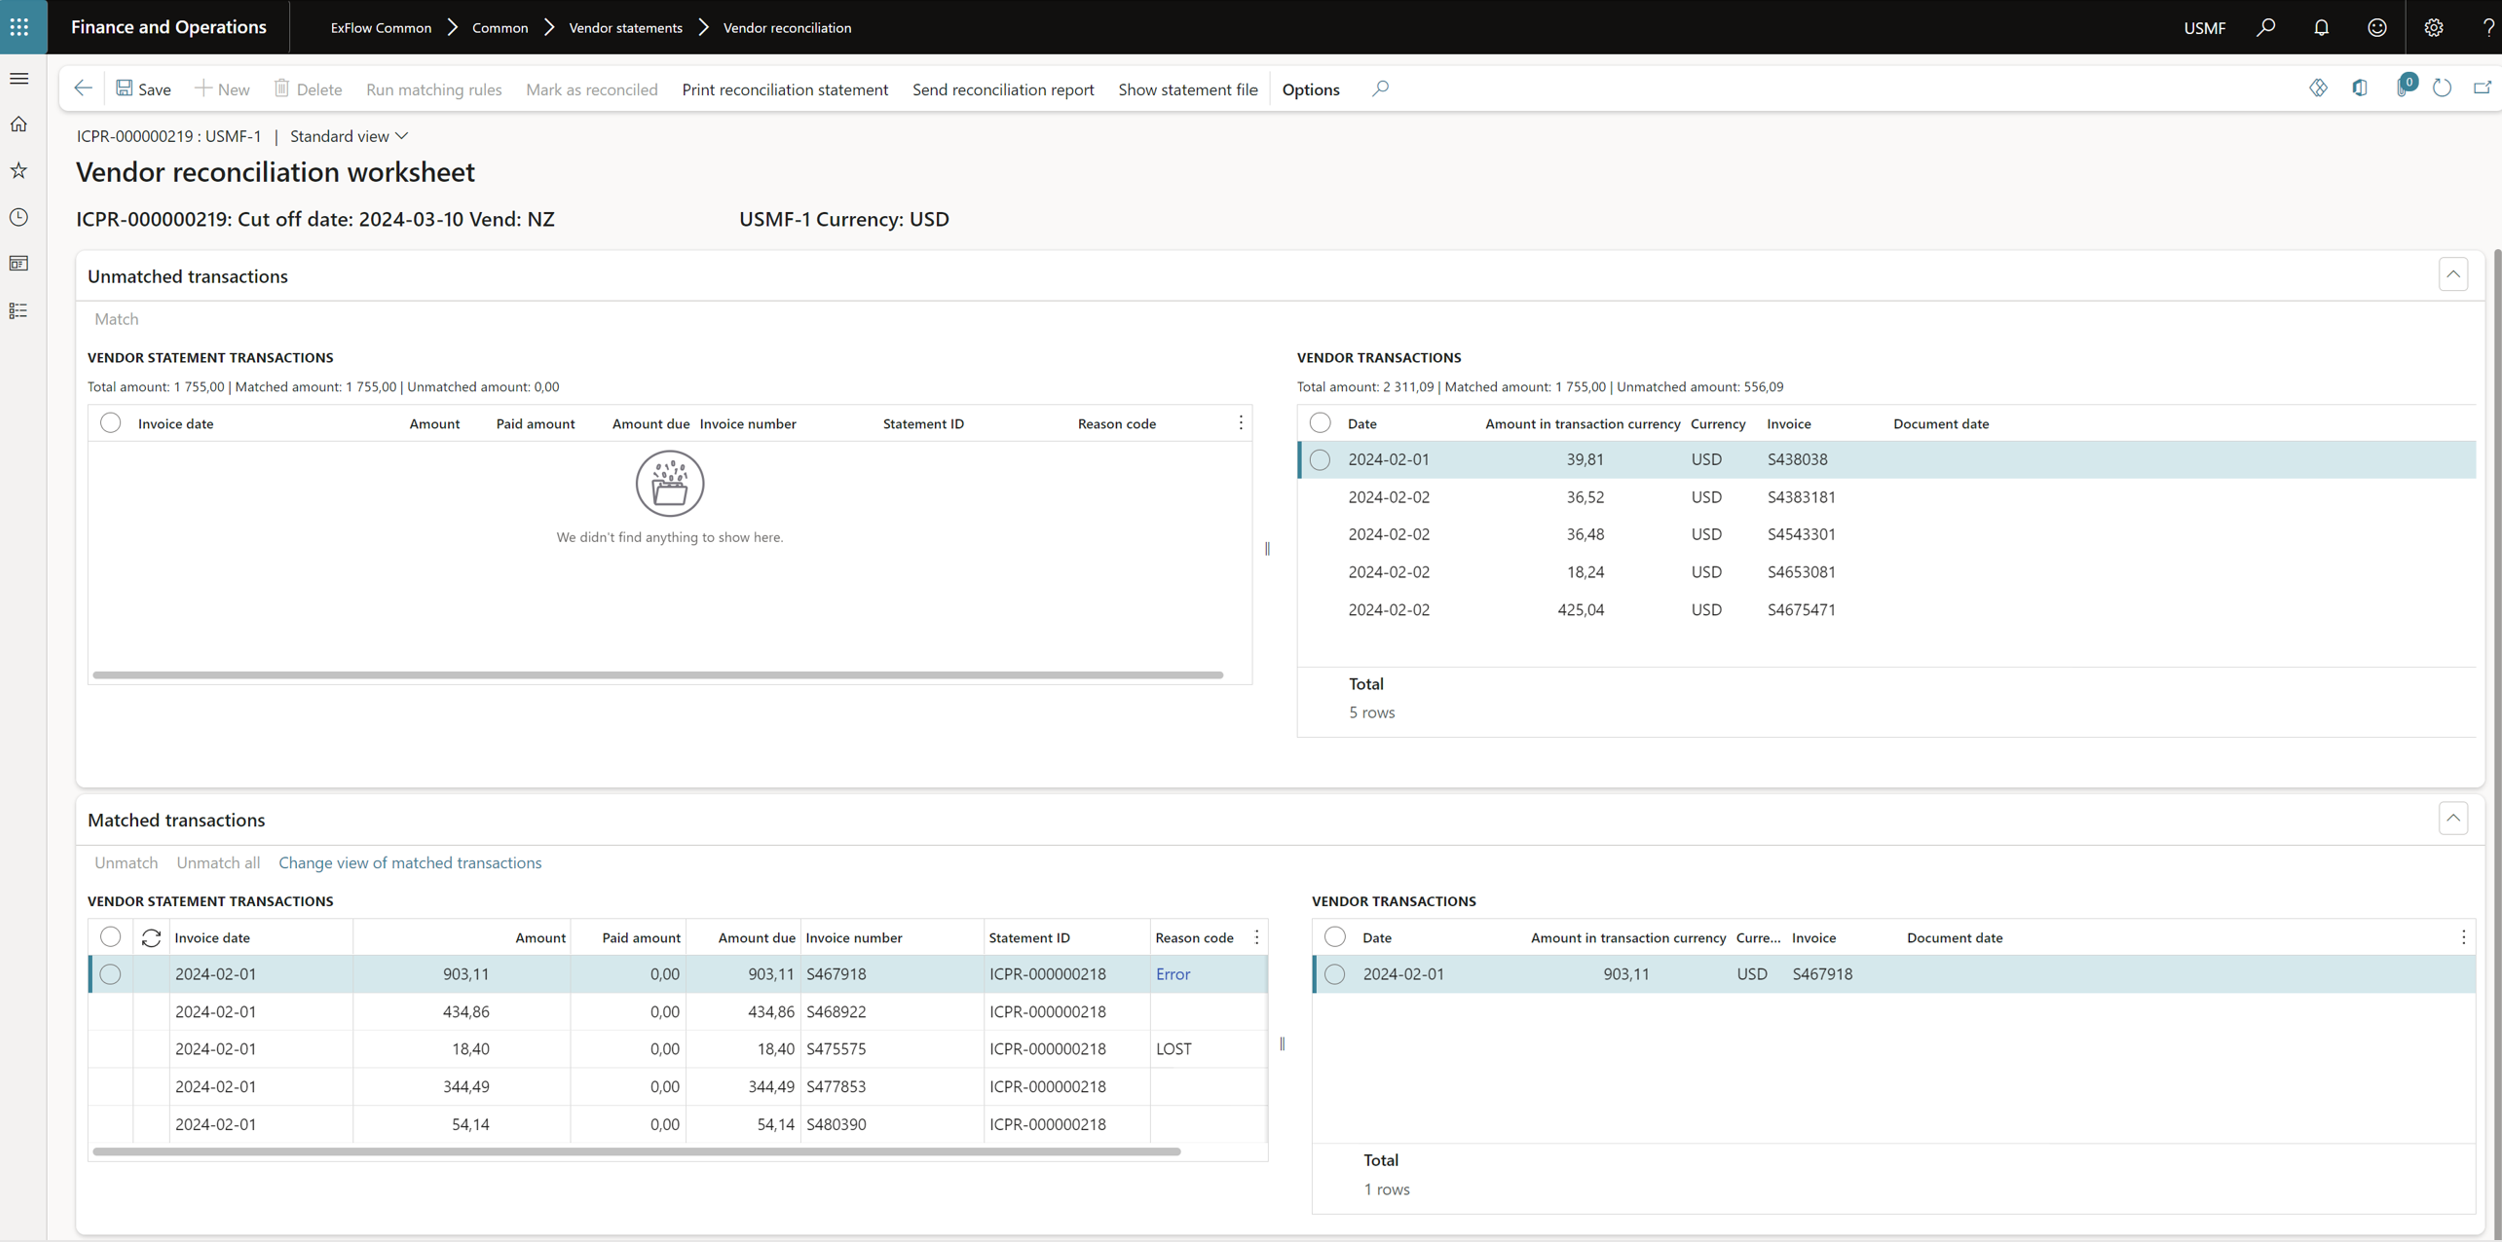
| Vendor statement transactions | Imported vendor statement lines. |
| Vendor transactions | Open vendor transactions. |
| Matched transactions | Statements lines that are match against the open vendor transactions. |
| Vendor transactions | If you mark the match transaction on the left side the right side shows the vendor transaction that is match against the statement line. |
| Match | Manually match the transactions. |
| Unmatch | Unmatch the marked transaction. |
| Unmatch all | Unmatch all the transactions. |
| Change view of matched transactions | Change the order of matched transactions views. |
Step by step process
Import Vendor statement methods
- Scan and verify the statement in Exflow Data Capture or manually upload the xml or csv file, see below step 2.
- Mandatory fields
- Invoice number - If blank from EDC, EDC is adding “no value” in the xslt.
- Amount – Needs to be higher than 0.
- To date - need to be unique per vendor.
- Run the batch jobs for Import vendor statement XML files and then the job for Import vendor statement from history.
- Go to the Vendor statement form and make sure that the statement is imported and matchings rules are run.
- Mandatory fields
When automation option is enabled, statement will end up in the “Vendor statement” form. ExFlow – Common – Vendor statements – Vendor statement.
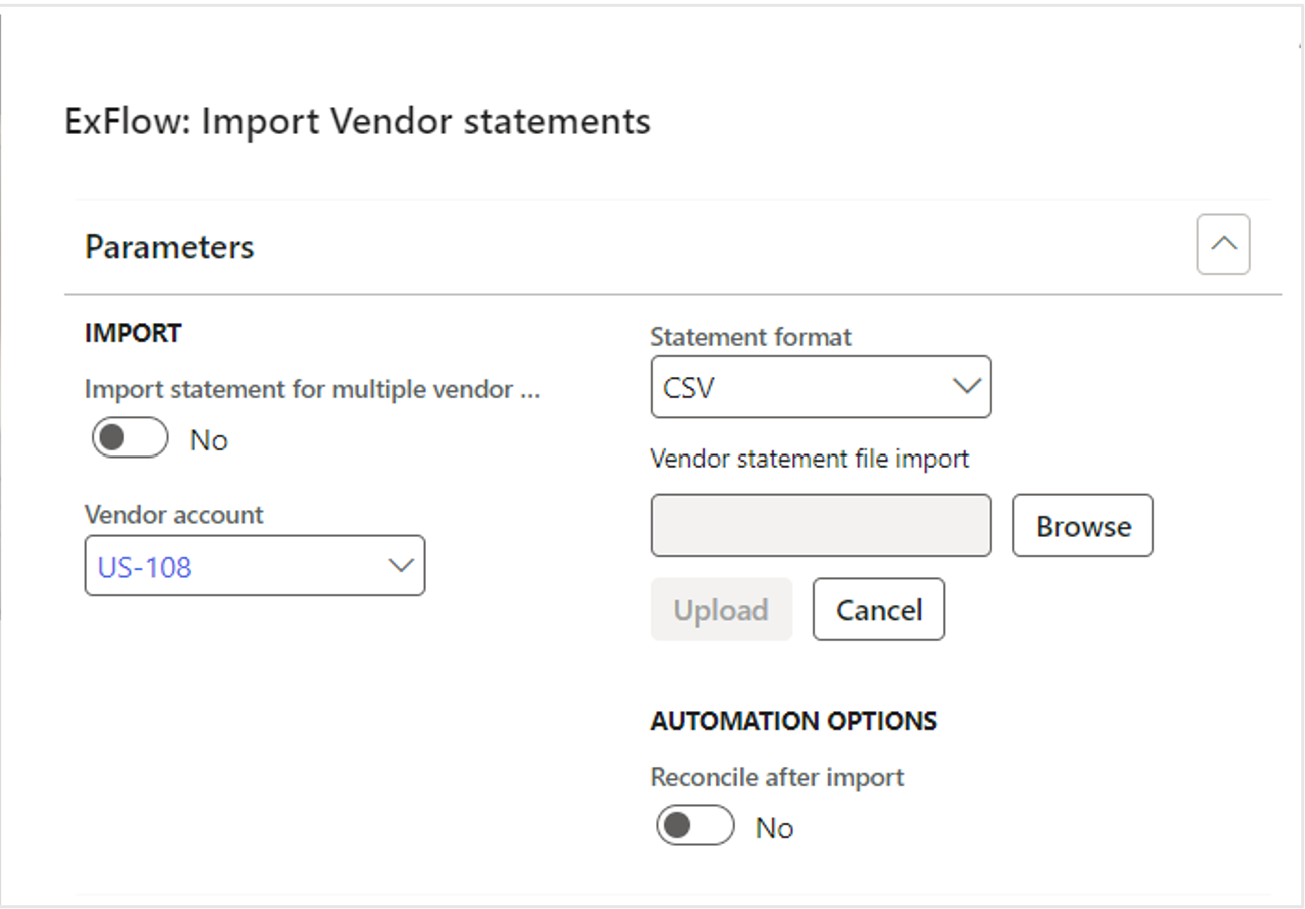
- If you manually import statement files, navigate to ExFlow Common – Periodic tasks – Import vendor statement from file.
-
Dialog allows to select the Statement format select CSV or XML.
Import statement for multiple vendor accounts: allows to import from multiple vendor accounts.
Vendor account: drop-down list to select a specific vendor account.
Vendor statement file import: to upload vendors statement from file.
Automation options: “Reconcile after import” enable or disable allows system to validate vendor statements and create a new vendor reconciliation and worksheet automatically, runs matching rules and validation when statement is uploaded. -
Select Vendor statement file to import, press upload and OK.
-
Notification that Operation is completed.
-
If automation option is disabled the statement will be in the “Import vendor statement history” form. And you need to import it manually and after import validate the statement.
ExFlow Common – Inquiries and reports – Import – Import vendor statement history.
When automation option is enabled, statement will end up in the “Vendor statement” form.
ExFlow – Common – Vendor statements – Vendor statement.
Note: Same dialog can be reached in Vendor statement form, by clicking Import statement.
Reconciliation of the Statement
-
Navigate to ExFlow Common – Common – Vendor statement – Vendor reconciliation. If you selected the automation “option reconciled after import”, the statement will be created.
and validated and end up in the “Vendor statement” form. (ExFlow – Common – Vendor statements – Vendor statement).
And the reconciliation form will be automatically created and the matching rules will be run.
(ExFlow – Common – Vendor statements – Vendor Reconciliation).
Continue from below step f. -
If you manually imported the statement, you need to create a reconciliation line and pick up the statement;
select “New”, and follow below steps c - e. -
Select the “Vendor account” on the line.
-
Press “Save”.
-
“Last statement ID” will be picked up automatically on the line.
-
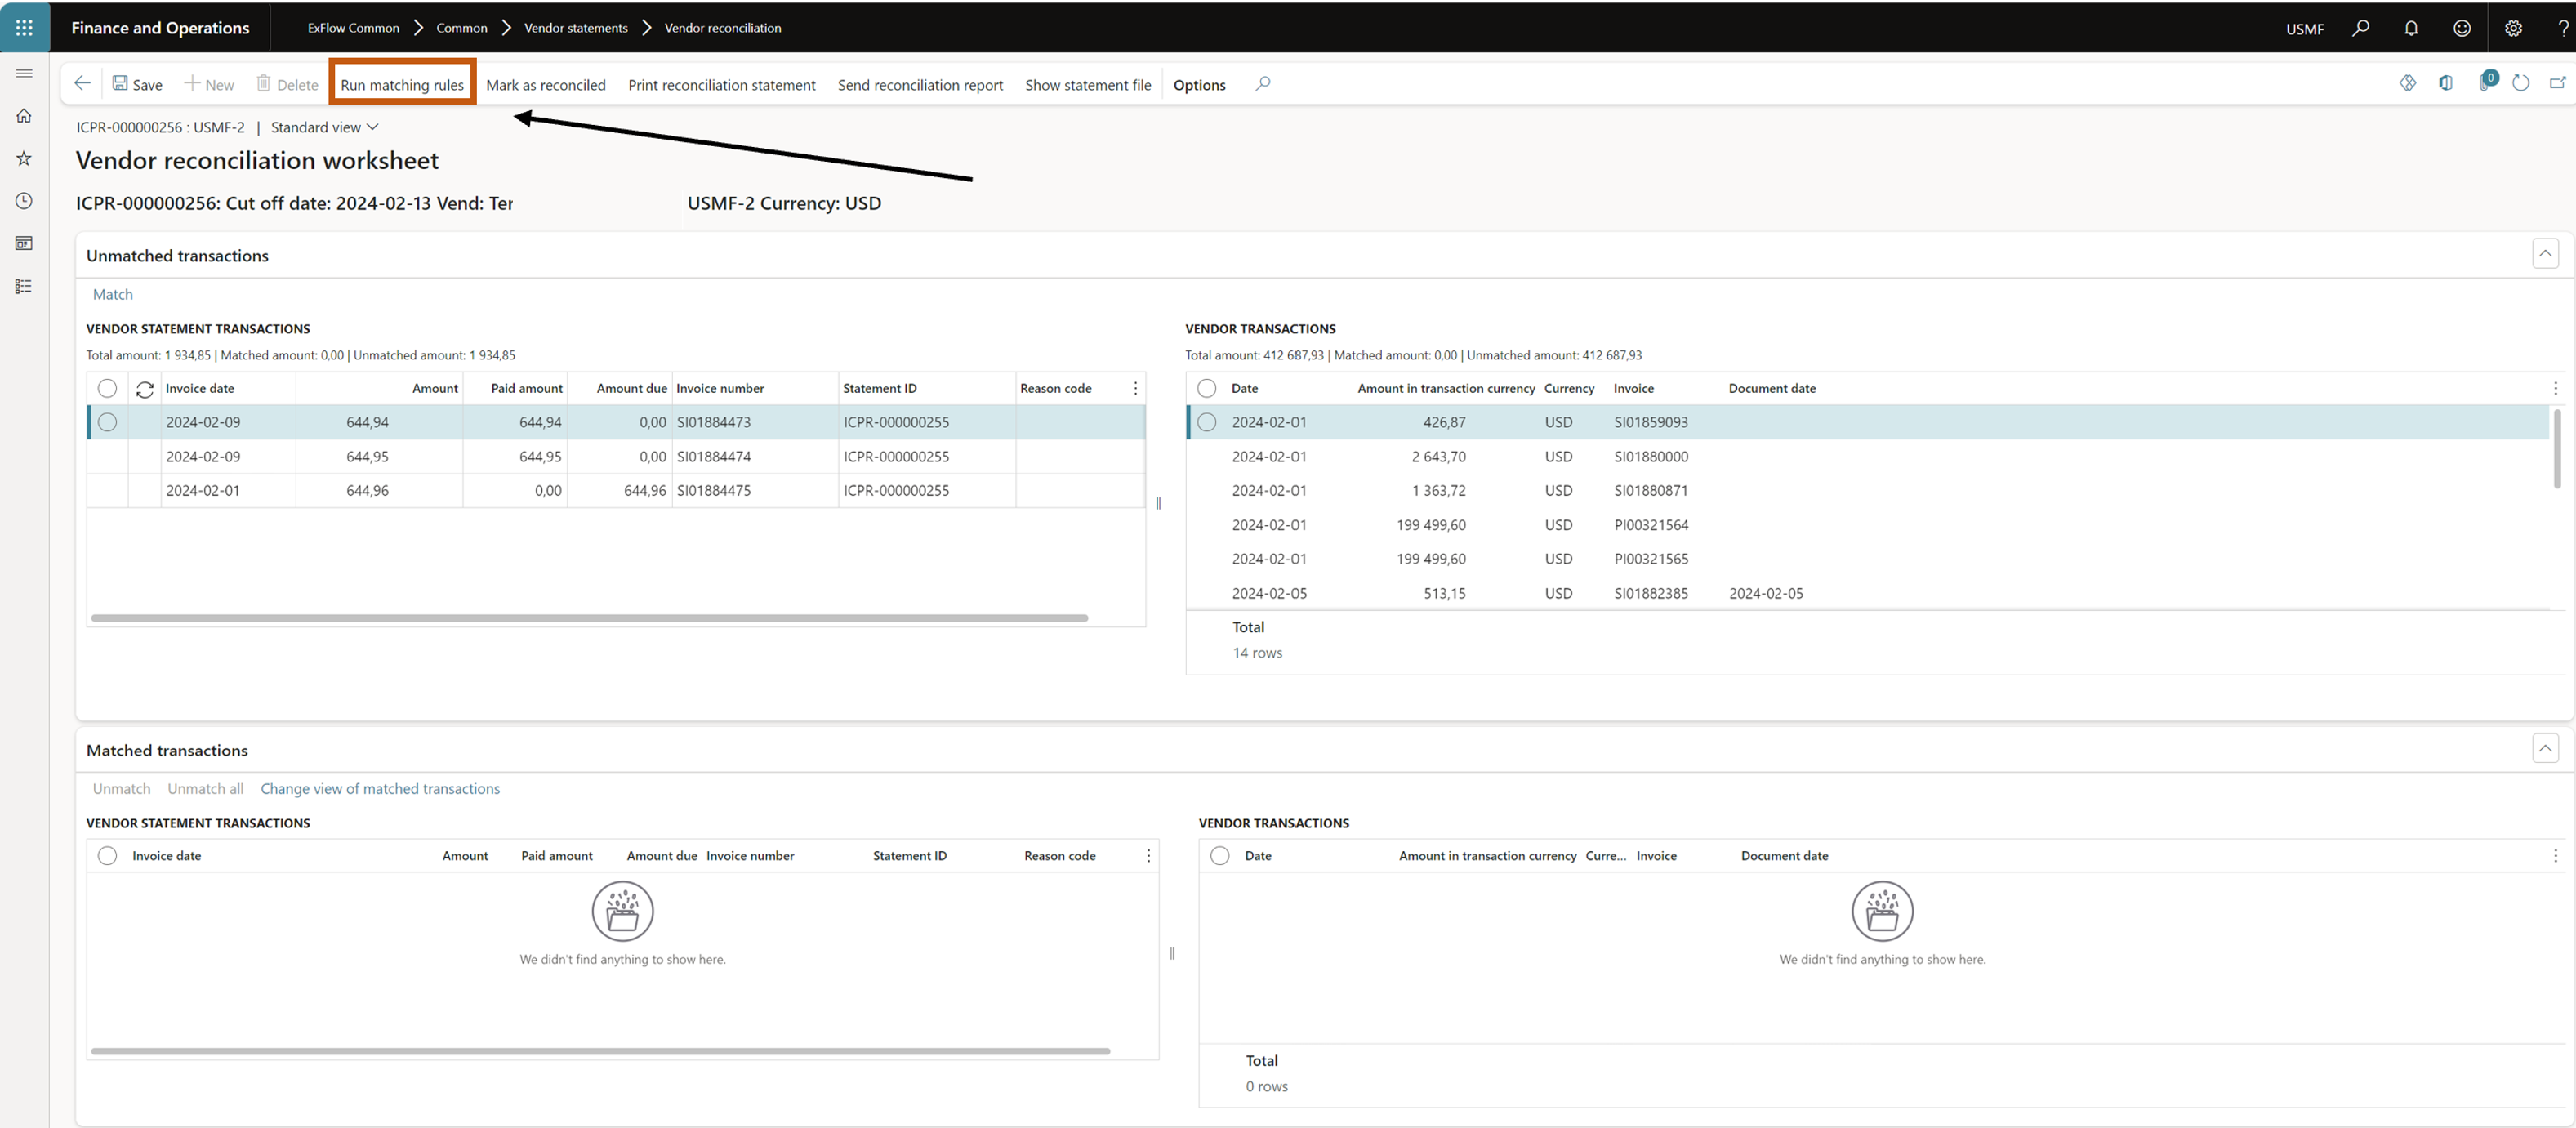
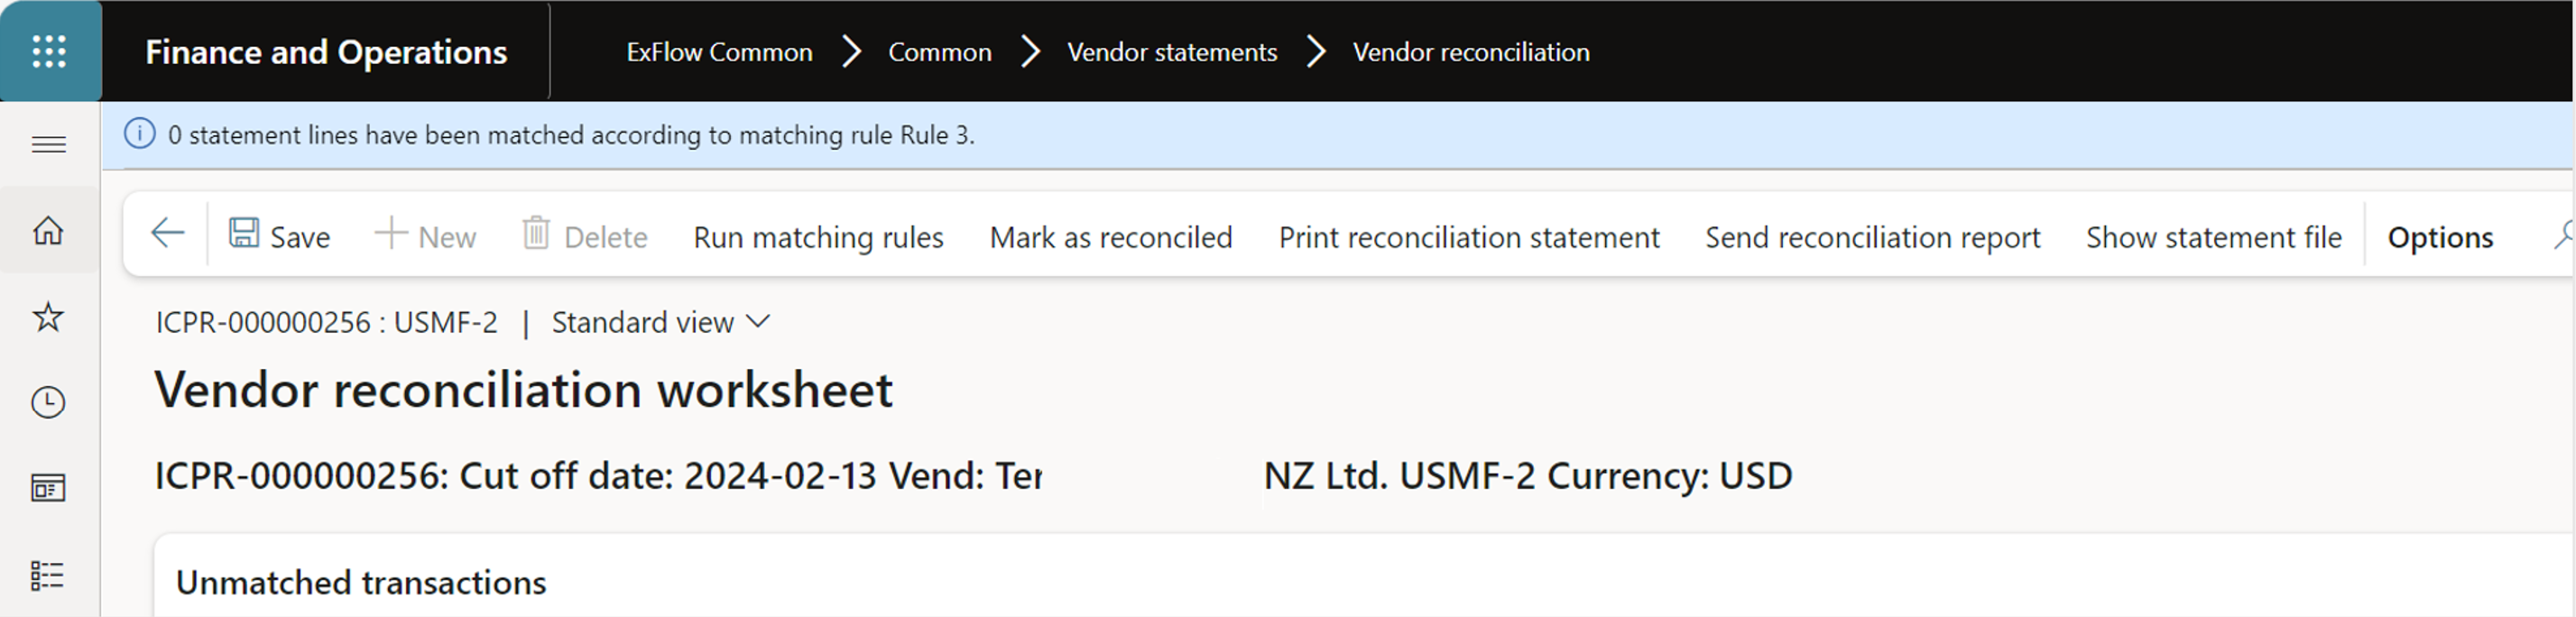
On the action panel select “Worksheet”. Worksheet is where reconciliation happens.
-
In the Worksheet press “Run matching rules” to run matching rules, dialog will open to run the batch job.
Notification with number of statement lines will be displayed which were matched according to matching rules.
If you have imported the opening balance
Opening balance is calculated from previous statements closing balance, if difference from imported amount for opening balance a new statement line is created for the difference amount. This line cannot be automatically matched and needs to be manually handled to find the right vendor transactions to match against.
If the opening balance is empty from file - previous statements closing balance is set.
- When the matching is run, and the statement lines are matched against the vendor transactions, select “Mark as reconciled” to close the reconciliation.
If some of the lines are not matched, you can manually match the lines to vendor transactions by manually marking them as matched. Or if not, a vendor transaction is found the unmatched statement line will appear in the reconciliation statement report for exceptions.
If needed, you can Unmatch the transactions by marking the records and select the “Unmatch” button.
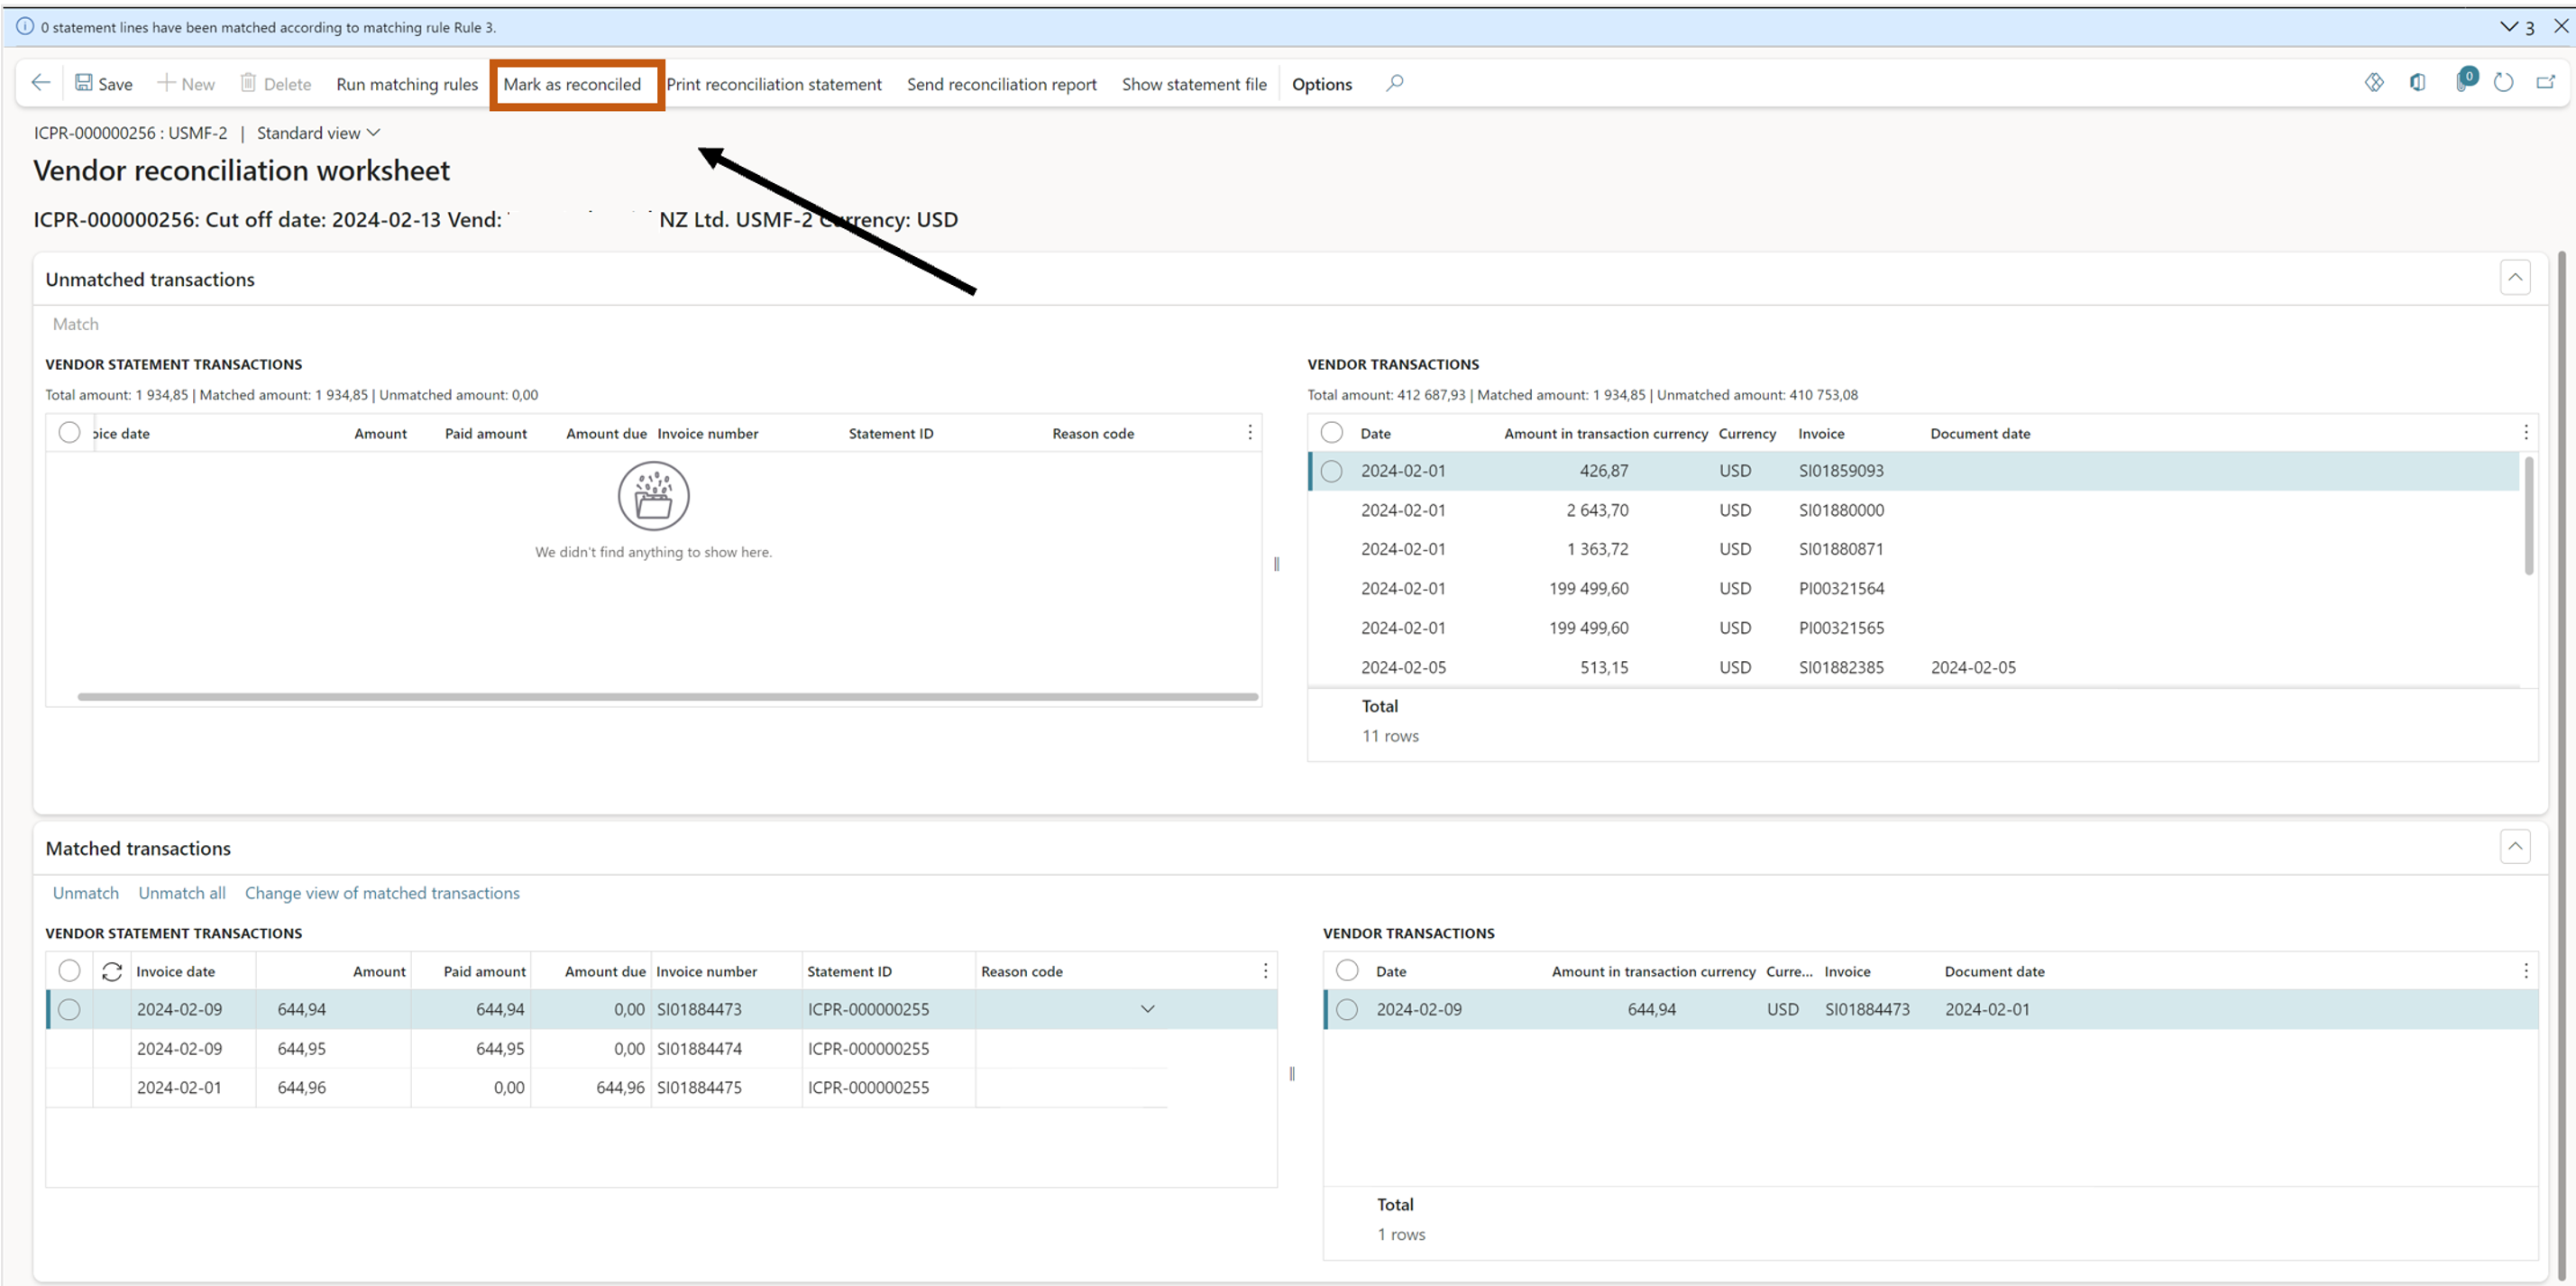
- When the reconciliation is marked as reconciled, the status will be changed and column “Reconciled” will be ticked.
Print the Vendor reconciliation report
When the reconciliation is marked as reconciled, the reconciliation report showing the exceptions is ready to be sent back to the vendor.
In the Vendor reconciliation form, in the action panel select the “Print reconciliation statement”, the reconciliation report will be generated and from here you can manually print the report or export it in formats as PDF, Excel, word, CSV, XML, MHTML or TIFF.
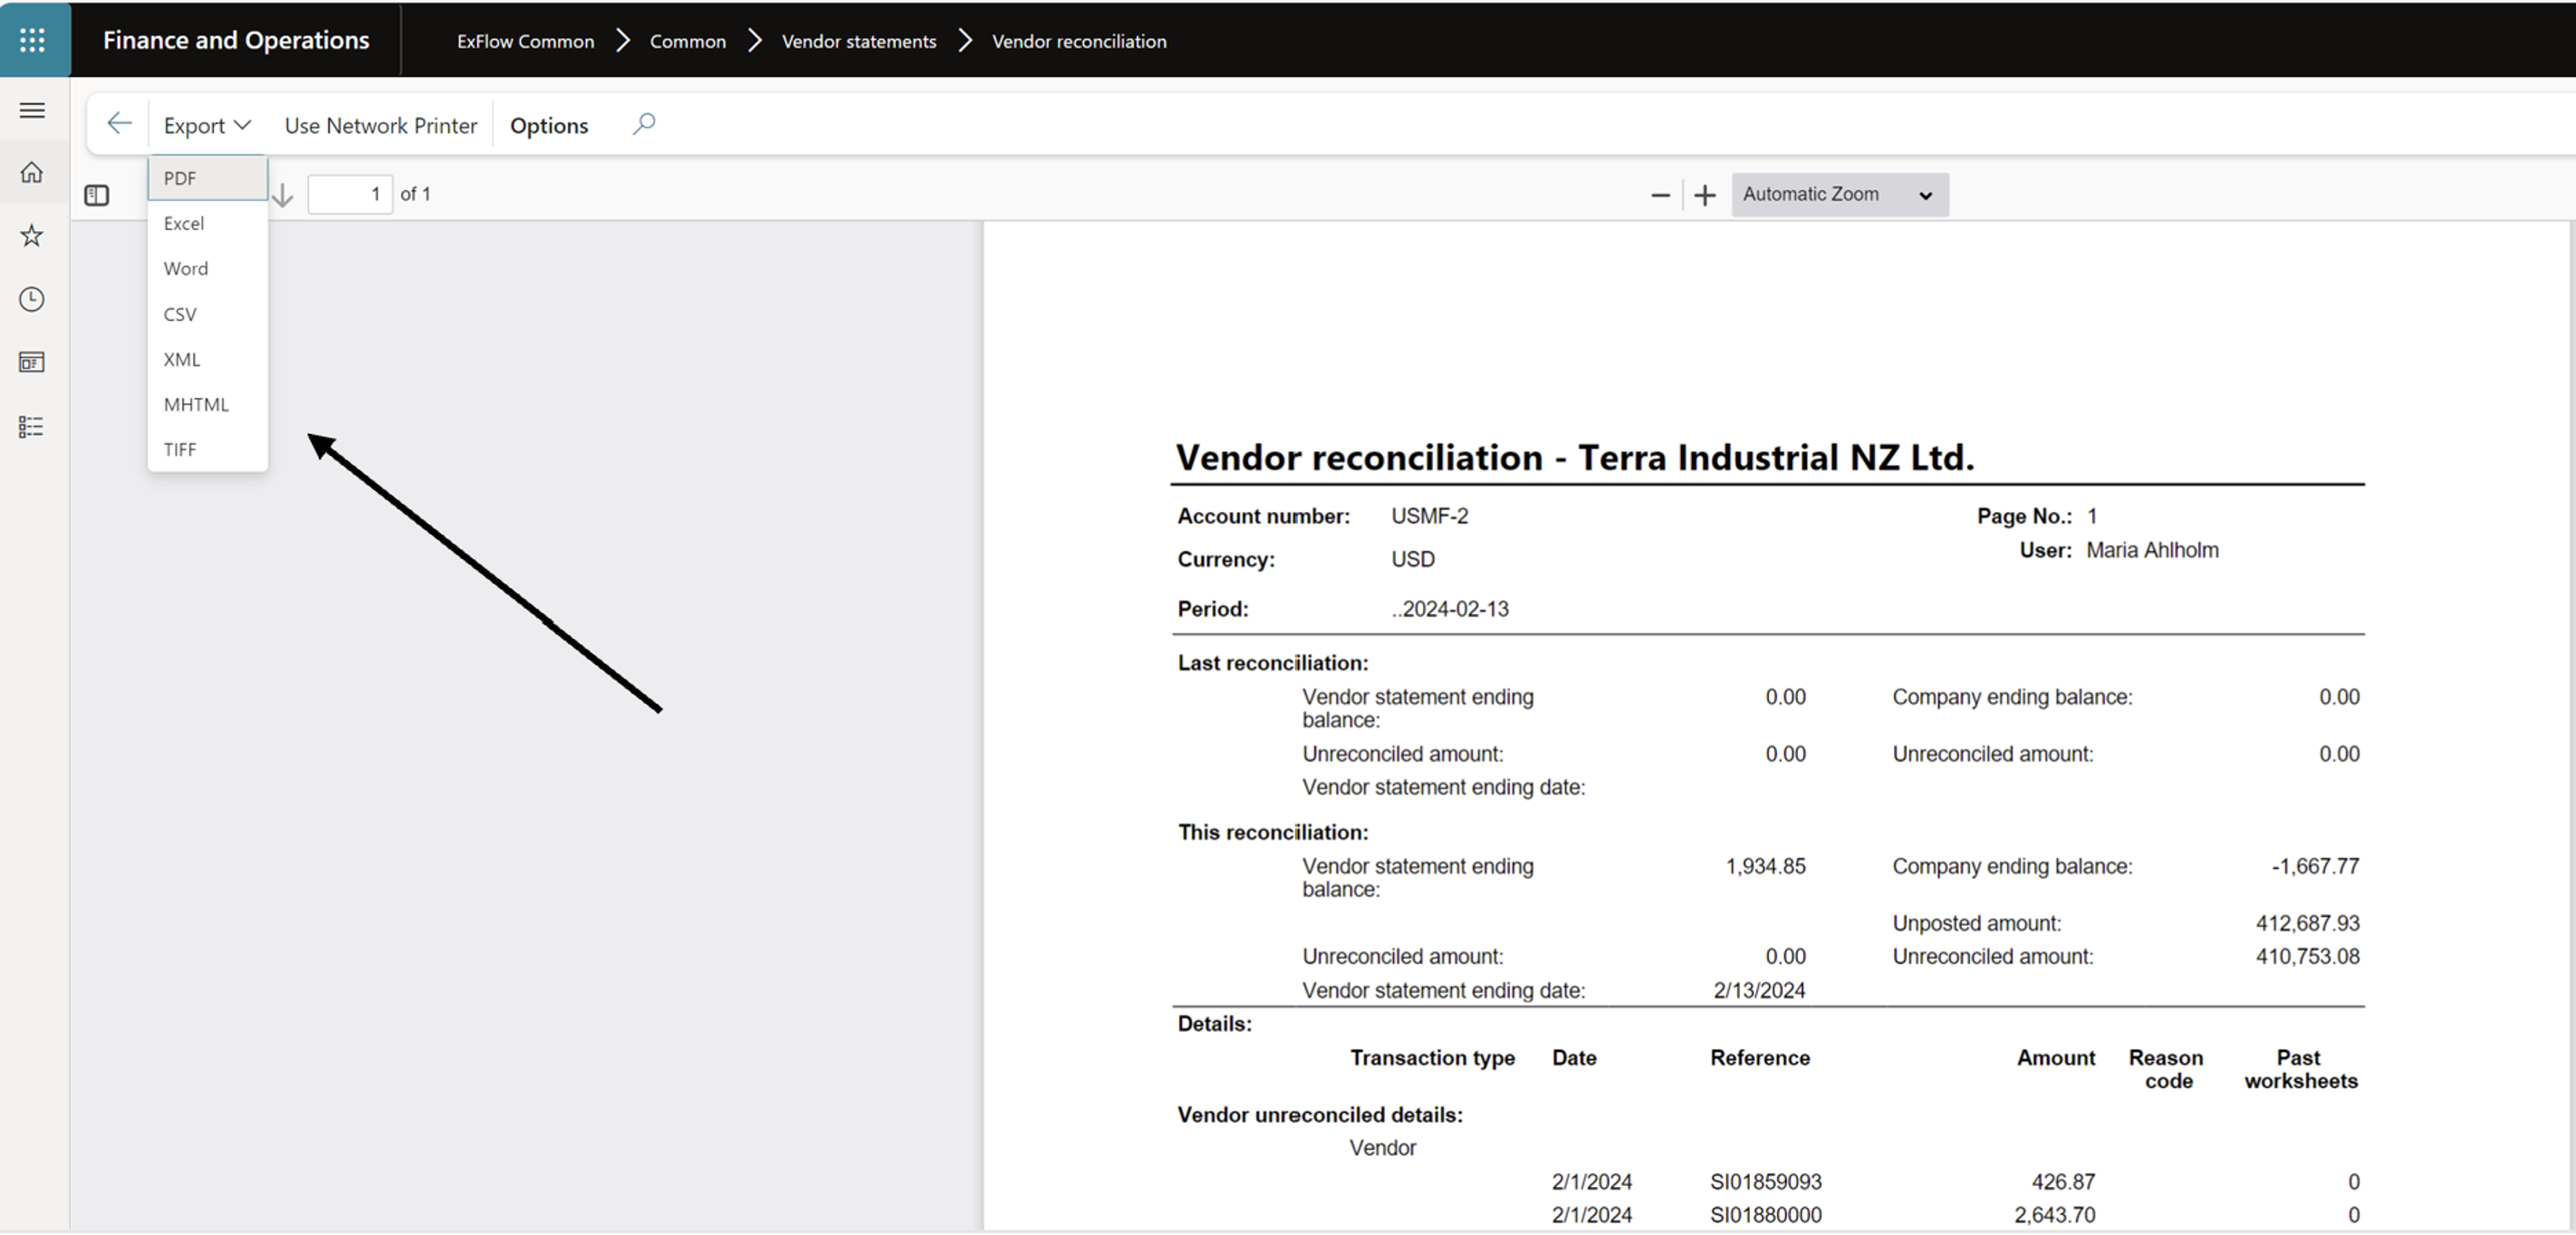
| Last reconciliation | Description |
|---|---|
| Vendor statement ending balance | Ending balance from the previous reconciled statement. |
| Unreconciled amount | Total amount of unmatched transactions from previous reconciled statement. |
| Vendor statement ending date | End date on the previous reconciled statement. |
| Company ending balance | Ending balance, open transactions for the vendor. |
| Unreconciled amount | Total amount of unmatched transactions for the vendor. |
| This reconciliation | Description |
|---|---|
| Vendor statement ending balance | Ending balance for the actual statement. |
| Unreconciled amount | Total amount of unmatched transactions for the statement. |
| Vendor statement ending date | Cut-off date for the statement. |
| Company ending balance | New ending balance, open transactions for the vendor. |
| Unposted amount | Total amount of unposted transactions for the vendor. Amount is changed when statement is posted. |
| Unreconciled amount | Total amount of unmatched transactions for the vendor. |
| Details | Description |
|---|---|
| Vendor unreconciled details | Specification of the vendor transactions that is not yet matched against any statement. |
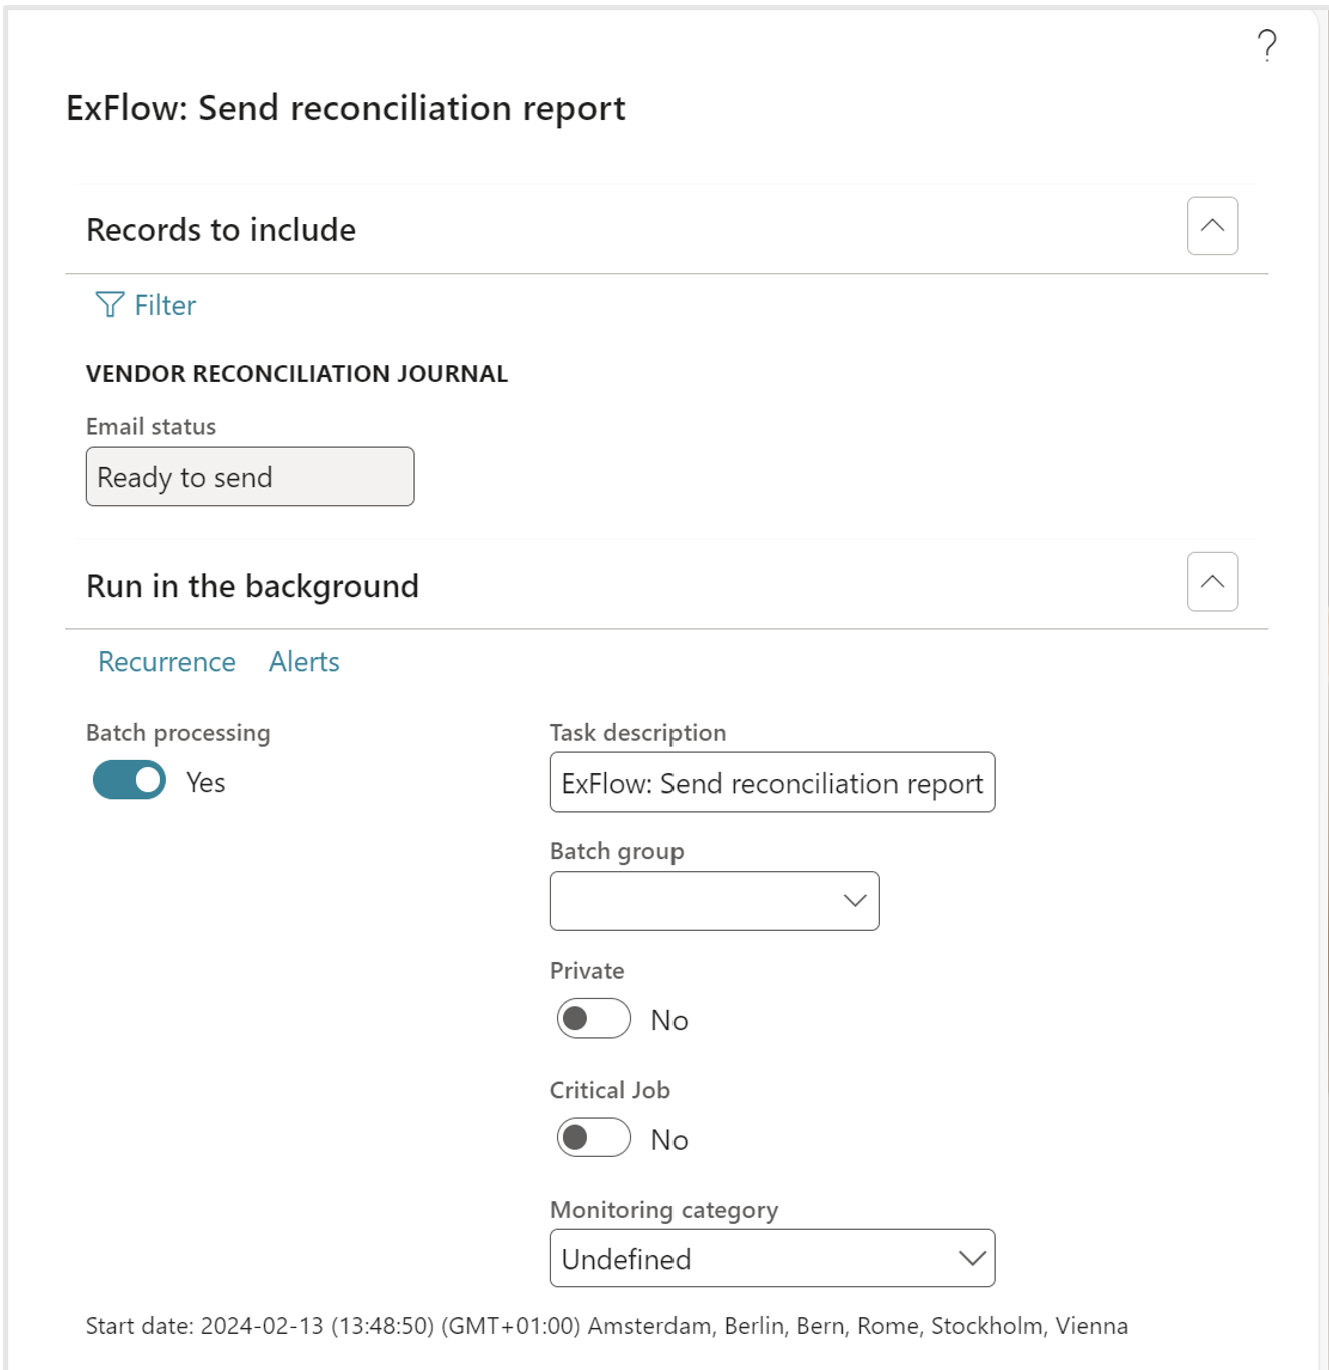
Send the reconciliation report as email
Reconciliation report can be sent via e-mail, select button “Send reconciliation report” in Vendor reconciliation form. You can also be setup and run as batch job from ExFlow common – Periodic tasks – Vendor statement – Send reconciliation report.
The functionality creates an email, addressed to the email defined on the statement or the vendors primary email address if no email is defined on the vendor statement.
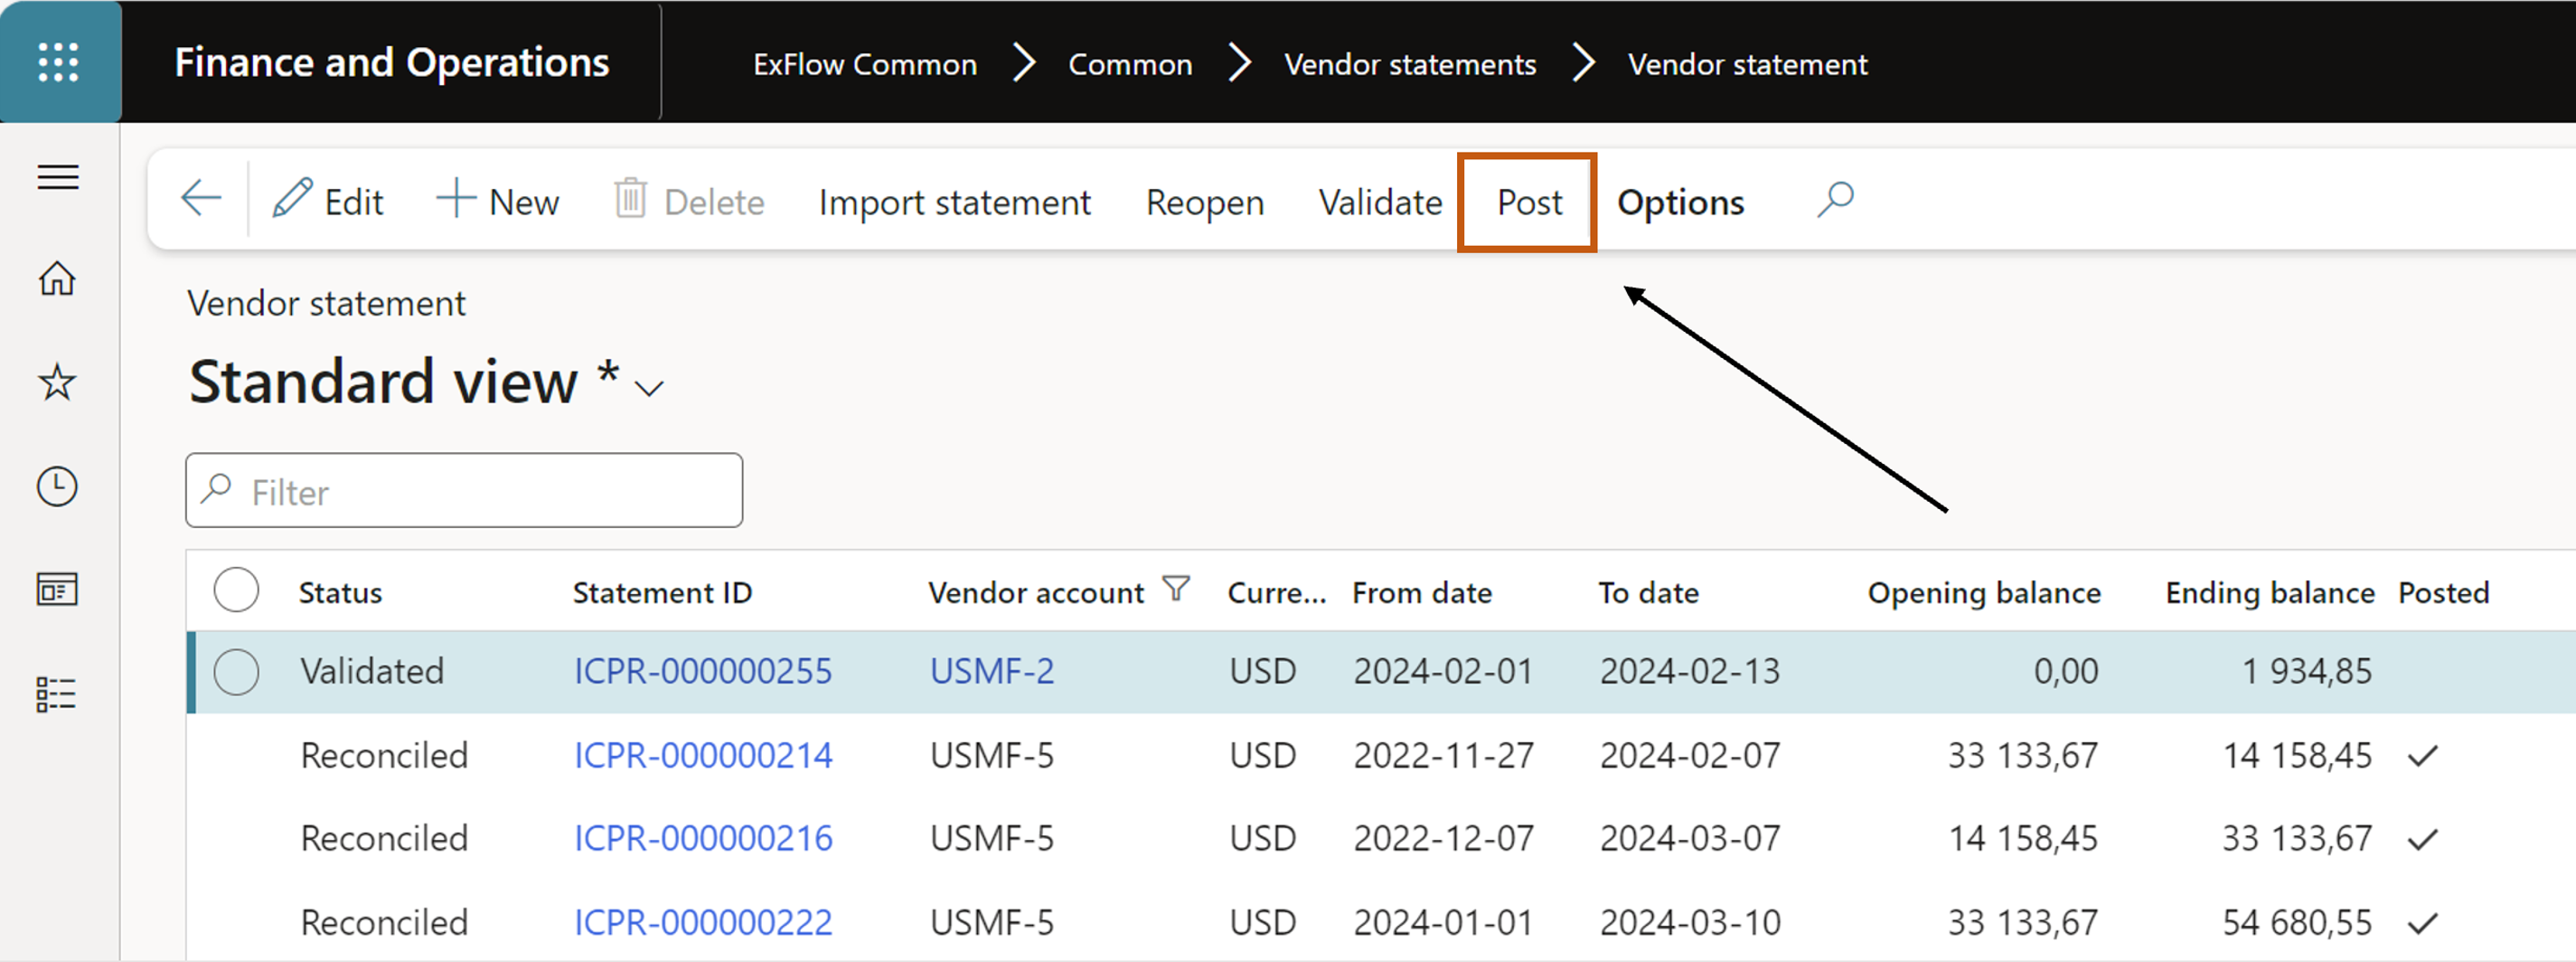
Post the statement
ExFlow Common | Common | Vendor Statements| Vendor statement
To close the reconciliation work for the statement and end the process, you need to after reconciliation is done go back to the statement and post it.
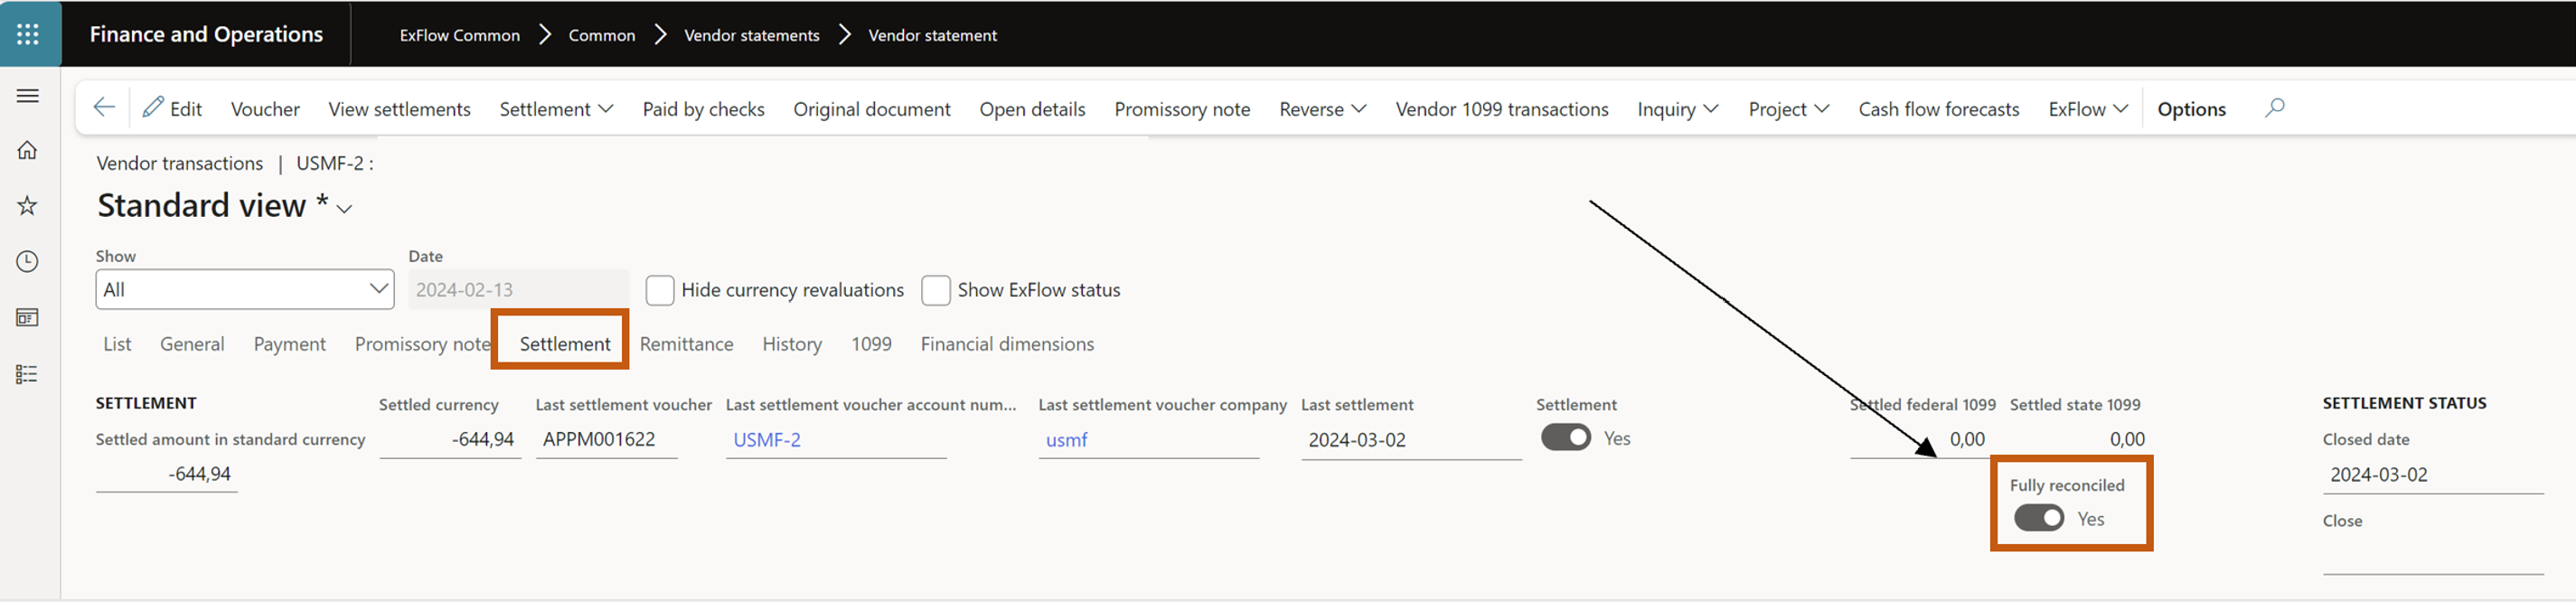
When a statement is posted, will the vendor transactions that are part of the reconciliation of the statement and fully paid (0 amount remaining) be marked as reconciled using the new tag in vendtrans, tab settlement.
- Navigate to the Vendor statement.
- Mark the statement you want to post, select “Post”. The statement will now be ticked as posted in the column for “Posted”. And buttons for Reopen and Validate will be greyed out.
The process is now complete and the vendor transaction if it is fully paid will be marked as “Fully reconciled". If the vendor transaction is not paid it will be open for matching for the next statement for vendor until the transaction is paid.